Attention: For proper streaming operation, ports 8080 and 1935 must be allowed in the firewall.
Local streaming refers to transmitting a video or a set of elements over a network in video format. In this documentation, we will cover local streaming, meaning that internet access is not required for streaming.
Below, we illustrate how the elements involved in local streaming are organized.

streaming local model 4yousee.png
Input Types: Here you must decide what you want to transmit. Options include a webcam, a TV signal, one of your computer screens, a specific video file from your computer, or even multiple sources at the same time. This is configured in the streaming manager, OBS.
Windows Computer on the Local Network: This computer is responsible for managing the stream and making it available either on the same machine or across the local network via a URL, for example:http://Computer_IP:8080/livestream
This URL can be accessed by players on the same local network.
OBS (Open Broadcaster Software): A program specialized in managing streams, responsible for composing the input sources on screen. Some examples:
- Example 1: Display a webcam together with a video from a local folder.
- Example 2: Stream a web page accessible only from this computer.
- Example 3: Stream a TV signal. In this case, the PC must have a capture device (e.g., HDMI to USB capture card).
NGINX: A program that creates a web server on the computer. This server handles streaming via OBS and makes it available on the local network through a URL.
4yousee Player displaying the stream: Finally, an HTML content is uploaded to 4YouSee Manager containing the OBS stream URL. This content is added to a playlist, and the 4YouSee Player retrieves and displays the stream.
Steps to set up local streaming and display it on 4yousee Player
- Download and install OBS
- Download and configure Nginx
- Configure OBS
- Select sources
- Configure streaming
- Publish the stream on 4yousee Manager
Download and Configure Nginx
Below is the download link for Nginx. Download the compressed file and extract it to C:\ on your computer. To do this, right-click the Nginx.zip file, select "Extract files...", choose C:\, and click OK.
Click here to download Nginx.
Next, start Nginx by running the Nginx - Shortcut file located in C:\Nginx.
Your web server will now be active. You can verify this by accessing:
http://localhost:8080
in your browser. A default Nginx page should load.

If an error message appears when running Nginx as shown in the image, download the required DLL and copy it to:
- C:\Windows\System32
- C:\Windows\SysWOW64
The final step is to configure Nginx to start automatically when the computer boots. Copy the Nginx - Shortcut from C:\Nginx and paste it into the Windows Startup folder.
To access it:
- Open the Start menu
- Type Run and open it
- Enter: %AppData%\Microsoft\Windows\Start Menu\Programs\Startup
- Click OK
Paste the shortcut into the Startup folder.

OBS Configuration
Source Selection
After installing OBS, open it and define your inputs (called sources in OBS). Available options are listed in the interface.

After adding sources, they will immediately appear on your screen.
Example configuration:

Once your sources are defined, proceed to configure streaming.
OBS Streaming Configuration
Click Settings in the bottom-left corner of OBS (configuracoes_btn_pt.png).
Then go to Stream and fill the fields as follows:
Service: Custom
Server: rtmp://Computer_IP:1935/livestream
(Replace Computer_IP with the IP of the machine running OBS)
Stream Key: stream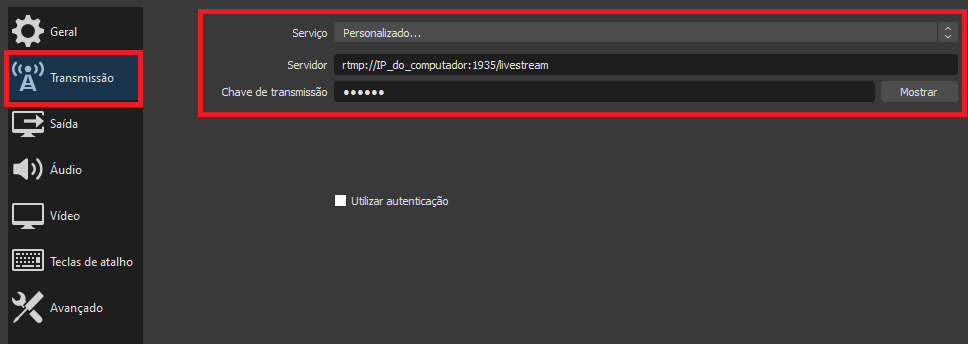
Publishing the Stream on 4yousee Manager/Player
Download the file Streaming_local.zip and extract it. The contents will look like the following:

If you want to display the stream on other computers in the local network, open the index.html file in a text editor (e.g., Notepad, VSCode, Notepad++) and replace localhost with the OBS computer’s IP.
If the stream will be displayed only on the local machine, no changes are needed.

Finally:
- Compress index.html and the files folder into a .zip file
- Upload it as content to 4YouSee Manager
The process is the same as adding any other content. Remember to:
- Disable Automatic duration
- Set the display duration manually
Done! Now just add it to the playlist of the desired player(s).
Extra Configuration (Optional)
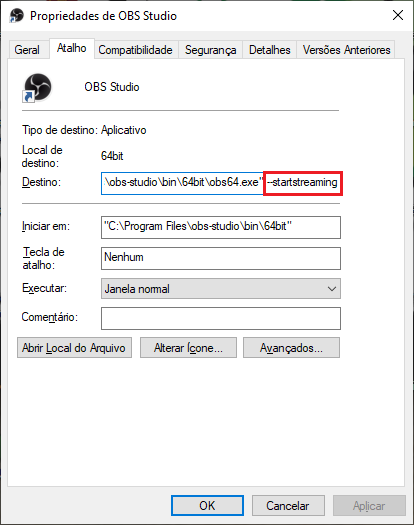
To start streaming automatically when the computer boots:
- Right-click the OBS shortcut
- At the end of the target field, add: --startstreaming
Then:
- Copy the OBS shortcut
- Paste it into the Windows Startup folder (%AppData%\Microsoft\Windows\Start Menu\Programs\Startup)
This ensures OBS starts streaming automatically when the system boots.